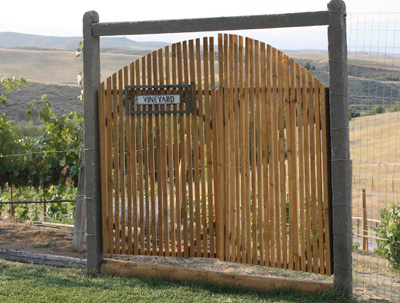
Wooden gates on concrete posts and header

Steel post braces

Bolts and hinges were set into the concrete while it was still wet
Now that we have discussed how to prepare and pour a normal in-line concrete post I want to share some additional thoughts concerning specialty post such as corner posts, hinged gate post s and header rails. You might recall that in my second entry on the subject of concrete post construction I mentioned how my great grandfather had the forethought to place a bolt in his posts while pouring them in order to attach pipe bracing when installing his fence line. I thought that was a great idea and did the same. In fact I sometimes put two or three bolts in posts that would require extra steel support bracing. Again, I was trying to keep my costs minimal and so I opted to use six foot steel fence posts as my bracing material rather than expensive galvanized pipe which would have had to be an inch diameter to work effectively. (Hopefully the images will better explain how this all looked and worked.) In the end I was very satisfied how well it all functioned when I eventually put the corner posts to the test by stretching the mess wire under some serious tension.
My next challenge was to improvise a means of hanging gates. My great grandfather had used normal wire to stretch gates but because this particular fencing project was in my front yard I wanted something a little more aesthetically looking. I not only wanted to build wooden gates, but I decided to include a concrete header beam as well. I hadn’t seen either of these things done before, but because I was so into what I was doing I decided to give it a try. I forgot to mention that I used heavier rebar on my corner posts than I had in my normal inline posts as I did on my gate posts. In order to swing my gate off of the concrete post I had to attach hinges onto the concrete while I was pouring them. I did this using heavy galvanized lag screws about three inches long. While my cement was still wet I wiggled them in and gently tapped the cement around them with a small stick. That process turned out to be effective and simple. Constructing and installing the header on the other hand took some special thought. I used the same forms to pour the header but blocked them off at the exact length I wanted my gate posts to be spaced. I put an extra length of rebar in them and wired a foundation bolt to the rebar in such a way that they could stick out of the header 4½ inches on each end. In this way they would be exactly long enough to reach through the gate post and take a large washer and nut. In order for them to go through the gate post I placed a steel tube through the top of those when I poured them. (Again, a picture can illustrate this better than I can describe it.) To my amazement everything came together and the gates I later built swung perfectly.


Leave A Comment
You must be logged in to post a comment.