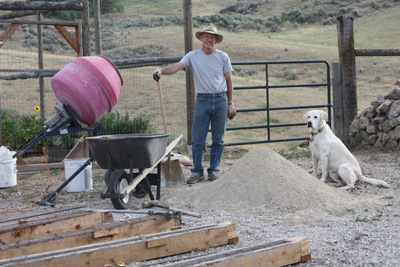
I learned by trial and error (mainly error) how rich to mix my cement so the posts wouldn’t crack
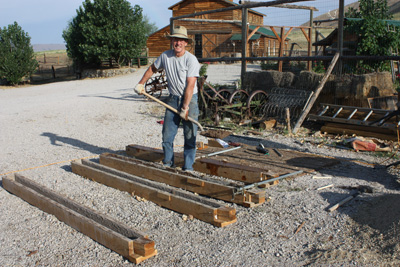
I spent the better part of a morning building four wooden forms that would be used over and over until all my posts were ready to use

Setting rebar and eyed foundation wire into wet cement

The finished posts made it easy to stretch and attach the fencing wire
In my previous blog I had explained my motives for spending the better part of my free time this past summer constructing concrete fence posts. I shared how we had needed to protect our orchard and vineyard from meandering deer and elk, and how I had become motivated to build posts that would outlast me. Having said that, I’d like to share in my next few blog entries on the construction process itself and what I learned from the experience.
As I explained, I’d been around concrete post construction all my life having been raised ( most weekends and vacations )on our old family ranch where my grandfather and great-grandfather had fenced the entire place with homemade posts. The problem was, like so my things in life, I took all those old posts for granted. What I mean is, because they had been there all my life I had never given much thought as to how they had been constructed or how much work that construction must have taken, especially in days when cement was mixed by hand and sand and gravel was shoveled out of dry creek beds. There were a few things however that I did notice. I had been aware that corner posts had been braced with large steel pipes (2” diam.) which had been attached to bolts that had been preplaced in the concrete at the time the posts had been made. I had also noticed that each post had small tubes running clear through the cement at one foot intervals allowing bailing wire to run through them in order to connect the fencing wire; both barbwire and mess-wire. I also noted that they had been poured in forms that created four inch by four inch posts. (In those days a 2 X 4 was really two inches by four inches unlike today’s smaller dimensioned lumber.)
As I prepared to start my project I spent the better part of a morning building four wooden forms that would be used over and over. I used long deck screws to attach the form lumber knowing that they would take quite a beating after an entire summer of service. I also created wooden removable top caps that would form a rounded end at the top of each post. I had noticed, as I mentioned in my previous blog, that in Spain many of the posts had rounded tops which gave them a bit of character. I then cut sticks of rebar steal into long lengths so they could later be set into the wet concrete at the time the post were poured. Having thought through the project in advance I chose not to run small tubes through my posts as my grandfather had done so many years before. I remembered noticing broken posts on the old ranch which had been broken at the very spot where those tubes ran through the concrete. Because the thought occurred to me that maybe they had weakened the posts, I decided I might try something different. Here is what I did. I purchased 4 X 8 sheets of concrete mesh; the kind you might use to reinforce a small slab or sidewalk. Using bolt cutters I cut them so that I had one long eight foot strand of steal wire with shorter six inch lengths extending from it at six inch intervals. I then bent the short six inch extensions into loops. It was my plan to place the eight foot length into the cement alongside the rebar with the heavy wire loops slightly sticking out of the cement. (See picture.) After the posts were installed this would give me places to adhere the fencing wire later. One other innovation I made was to cut ½ inch PVC tubing into eight inch lengths in preparation to set them (again when the cement was being poured) into the very top of each post. My thinking was that if I desired to make my fence another foot or two higher to discourage ambitious athletic deer I could later slide a short piece of rebar into the PVC tube that would have already been in place to provide a hole in the center top of the post. This was all that would be needed to construct the common posts, but the supporting corner posts and gate posts would need a few additional considerations. I’ll speak to this in a later blog.
One thing I learned by trial and error (mainly error), was how rich to mix my cement and how long it needed to let my wet posts cure in their forms before removing them. One thing I forgot to mention was that I decided to give my posts a slight bit of adobe color. I did this with a dark brown / red concrete die. I was trying to keep my posts under ten dollars each to prove that I could construct them at lesser cost than treated six inch farm posts. For that reason I almost chose against the die, but when all was said and done I managed to construct each post for a little over eight dollars (not considering labor) and was very pleased to have a little tint to the color. At first I mixed my concrete a little richer than necessary (four to one) and not only used more cement than needed, but weakened the posts. I also learned that a little wetter mix than I might use for masonry work made for a better outcome.
After a few trial and errors I used a five to one mix and found that the curing posts had less tendency to crack and later break. I also discovered that I needed to be picky about the sand and gravel mix I used. Because the posts are narrow it is crucial to use good clean sand. Also, I discovered that it was best to let the posts cure in their forms not moving them for at least forty-eight hours even in the hot summer sun. When I first started I had dropped them out of the forms at about twenty-four hours not realizing that it took longer for the concrete to cure in the bottom of the forms than on top where I could visibly observe the dryness.
Practice makes perfect and as time went by I became more proficient. It took me about one hour to mix and pour four posts at a time if all the needed materials were present and everything was cut and ready to go.


Tri – Thank you so much for sharing this. I was beginning to think I was the only person in the US who ever thought of using concrete fence posts. Now I have a practical way of putting it together. As you point out, it is not just a matter of doing something that will outlast me, but of actually leaving a tangible legacy for future generations.
I would love it if you could share a bit more detail on the specifics of the concrete forms – dimensions, materials, what size of rebar you used.
It is also encouraging to me to see a man your age taking on this project. If you can make enough for a spread the size of yours, then I at 70 can certainly do enough for my California one acre.
Is there a way to get notified when you post a new blog? I get sloppy and forget to check back on web pages that have interested me if I am not reminded from time to time.